2026 Singapore Digital Identity Photo Guide: Passing ICA AI Checks Every Time
Master the art of Singapore digital identity photos with our technical 2026 guide. Learn how to use a passport photo app to pass MyICA AI biometric checks for passports, ICs, PR, and Visas with zero rejections, including specialized tips for newborn photography.
You’re staring at an email from the ICA portal at 11:00 PM. It says your photo is "non-compliant," but to your eyes, it looks fine. It’s frustrating, but here’s the reality: by 2026, Singapore’s identity systems have moved entirely beyond human "best judgment."
When you upload a photo for a passport or NRIC, you aren't showing it to an officer at Lavender first. You're submitting it to a biometric algorithm that maps your face in 3D. If your lighting is off by a few degrees or your background has even a hint of HDB-corridor-yellow, the system flags it before a human ever sees your application.
Many residents search for a passport photo app to simplify this process, but not all editors are created equal. I’ve analyzed hundreds of rejections, and they almost always boil down to technical data gaps, not aesthetics. This guide is a technical breakdown of how to pass that AI check every single time.
The Logic Behind the MyICA Algorithm #
When you upload a file to the MyICA portal, the system immediately looks for "Landmark Points." These are precise coordinates: the corners of your eyes, the philtrum (the groove above your lip), and the tragus (the small pointed part of the outer ear).
The AI uses these to build a mathematical model of your face. If you use a "Beauty Mode" filter that smooths out these lines, the AI loses its anchor points. It doesn't care if you look great; it cares if your biometric ratios are measurable. This is why professional studio shots—ironically—often get rejected. Over-retouching kills the data the AI needs to see.
The Technical Blueprint: Decoding ICA Digital Specs #
ICA doesn't think in centimeters for digital submissions; it thinks in pixels and color space. Using a specialized passport size photo editor ensures you meet these exact parameters.
The 400x514 Pixel Rule and Aspect Ratios #
Your photo must be exactly 400 pixels wide by 514 pixels high. If your file is even one pixel off, the system’s auto-cropper engages. This is where most failures happen, as the auto-crop often clips the top of the hair or positions the eyes outside the allowed horizontal band.
According to the ICA official photo guidelines, your head must fill 70% to 80% of the frame. That’s a very small margin. If your head is too small, the AI can’t resolve your features; too large, and there’s no "buffer" to verify the background.
The #FFFFFF Mandate: Why Your White Wall Looks Grey #
This is the #1 cause of rejection. You stand against a white wall in your flat and take a photo. To your eyes, it's white. To a computer, it's often a light grey (#E1E1E1).
The ICA requires a pure white background (#FFFFFF). If there is any yellow tint from a warm lightbulb or a shadow from your shoulders, the AI can't distinguish the edges of your silhouette. Professional AI background removal tools are the only way to ensure a perfect #FFFFFF hex code every time.
The Home Studio Setup: Pro Tactics for Zero-Shadow Photos #
You don't need a professional camera or to find a passport photo shop near me. A modern smartphone has more than enough resolution. You just need a better strategy.
The 2-Metre Rule to Prevent Facial Distortion #
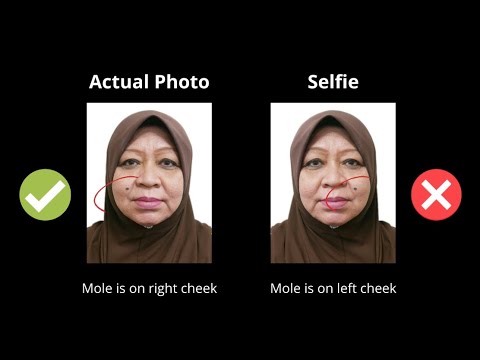
Never take a passport photo as a selfie. Front-facing cameras have wide-angle lenses that cause "barrel distortion." This makes your nose look larger and pushes your ears back, warping the biometric ratios the ICA uses for verification.
Stand 2 metres away from the camera. Have someone else take the shot using the 2x or 3x telephoto lens. This flattens your facial features and provides an accurate, undistorted representation of your face.
Lighting: Eliminating the 'Mugshot' Shadow #
Shadows are the enemy. A shadow behind your ears can change the perceived shape of your head.
The Pro Trick: Face a large window during the day, but avoid direct sunlight. The natural, diffused light fills in your features. If you still see shadows under your eyes, hold a piece of white A4 paper at chest level (just out of the frame). It acts as a reflector to bounce light back up into the dark areas of your face.
The Newborn Masterclass: Compliance Without the Tears #
Getting a newborn passport photo that is compliant for a 3-month-old’s first Singapore passport is a rite of passage. It’s also incredibly difficult because they won’t sit still or look at the lens.
The Floor-Sheet and Continuous Shooting Method #
Don't try to hold the baby up. Lay a clean, ironed white sheet on a firm mattress. Lay the baby down on it.
- The No-Hands Rule: You cannot have your hands in the frame supporting the baby.
- The Eye-Line: Use a high-contrast black-and-white card held right next to the camera lens to get them to look up.
- The AI Assist: This is where IC Photo Singapore saves lives. You can take the photo on any flat surface, and the AI will handle the background removal and perfect the 400x514 framing for you.
NRIC, PR, and Employment Pass Nuances #
While passports are common, the stakes are higher for Permanent Residency (PR) applications. The PR portal is notoriously sensitive. I've seen applications delayed by months over a single photo.
For PR photos, ensure your hair is tucked behind your ears and your entire forehead is visible. The AI specifically looks for the "full oval" of the face. For Employment Pass (EP) holders, the Ministry of Manpower (MOM) follows similar logic. Sticking to the ICA standard is the best way to ensure your photo works across all government portals, including Singpass.
Visa Standards: US, China, and Malaysia #
Don't assume your Singapore passport photo works for every visa. Every country has its own requirements for a passport photo maker to handle.
- US Visas: They require a 2x2 inch (51mm x 51mm) square. You must have a specific head height of 1 to 1 3/8 inches. Check the US Department of State site for their specific cropping tool.
- China Visas: These are picky. They require a 33mm x 48mm size with a very narrow head-width requirement that differs from Singapore's.
- Malaysia Passports: If you're a Malaysian in Singapore, the MyOnline Passport system is very strict about hair color contrast. If your hair is black, your lighting must be bright enough to distinguish the hair texture from the background.
The Beauty Mode Trap: Why Retouching Fails Biometrics #
We all want to look our best, but "Beauty Mode" is a guaranteed rejection. These algorithms smooth out the nasolabial folds—the lines from your nose to your mouth. These aren't just "wrinkles"; they are key biometric data points.
If you have a temporary blemish, leave it. The ICA’s AI is trained to ignore temporary marks, but it will flag a face that looks "plastic" or over-processed. If you must edit, use a compliance-focused tool like the IC Photo Singapore editor. It cleans up the technical elements (background, size, lighting) without distorting your actual facial features.
Frequently Asked Questions #
What is the Singapore passport photo size in pixels? #
The digital requirement for MyICA is exactly 400 pixels wide by 514 pixels high. The file size should be between 50KB and 2MB.
Can I make a passport size photo online for free? #
Yes, you can make passport size photo online free using basic cropping tools, but they often fail to provide the exact #FFFFFF white background required by ICA. Professional AI editors are recommended to ensure compliance.
Is there a free passport photo app for Singapore? #
While many apps are free to download, look for those specifically calibrated for the sg passport photo size and ICA's 2026 biometric standards to avoid application delays.
What does "Image not sharp" mean in an ICA rejection? #
This usually means the photo was taken with a selfie camera or in low light, resulting in digital noise that prevents the AI from mapping your features accurately.
Troubleshooting Rejection Codes #
If your photo is rejected, the ICA usually provides a code. Here’s what they actually mean:
- "Uneven lighting": Usually caused by a light source coming from one side. Turn 90 degrees to face the light source directly.
- "Invalid background": Your wall wasn't white enough, or there was a slight shadow or texture that the AI couldn't filter out.
- "Eyes not looking at camera": Even a slight head tilt throws off the eye-line coordinates. Look directly at the lens, not the screen.
Conclusion: Future-Proofing Your Digital Identity #
In a digital-first Singapore, your biometric photo is more than a picture—it’s a data key for your newborn photos and identity documents. Using a reliable passport photo app can save you hours of frustration. By following the 2-metre rule, utilizing natural window light, and passing your final shot through a dedicated AI compliance editor, you turn a stressful bureaucratic hurdle into a five-minute win. Don't let a soft shadow stand between you and your next destination.
Ready to Create Your Photo?
Get your perfect passport, IC, or visa photo in minutes. AI-powered, ICA-compliant, instant download.
Create Your Photo Now