ICA Passport Photo Troubleshooting: 15 Rejection Reasons Fix
Master the Singapore ICA passport photo requirements with our technical guide. We analyze 15 common rejection reasons, from lighting issues to biometric standards, ensuring your MyICA application is approved first-time with expert DIY tips and AI-powered solutions.
If you’ve ever sat down to renew your Singapore passport through the MyICA portal, you’ve likely felt that specific brand of anxiety when clicking 'Upload.' You wait for the progress bar, hoping the system doesn't spit back a red error message. Whether you are using a specialized passport photo app or a DIY setup, understanding the technical threshold is the difference between a 10-minute application and a 4-week delay.
I’ve seen this play out more times than I can count. A traveler is set for a year-end trip to Tokyo, they submit their photo, and three days later—rejected. In Singapore, the Immigration & Checkpoints Authority (ICA) doesn't just want a 'nice' photo; they require a high-fidelity biometric map. If your photo is rejected, it’s rarely about aesthetics; it’s because the file failed a technical litmus test designed for facial recognition algorithms.
Why ICA is So Strict (It’s Not Just Bureaucracy) #
Before we look at the failures, we have to understand the 'why.' Modern border control at Changi Airport now utilizes passport-less clearance via automated gates. These gates use biometric data—specifically the distance between your pupils, the width of your nose, and the contour of your jawline—to verify your identity in seconds.
If your photo has a shadow across your nose or your hair covers your eyebrows, the algorithm can’t find those landmarks. According to ICAO Document 9303, even a slight tilt of the head can drastically alter the mathematical 'map' of your face. ICA’s standards are a direct implementation of these global security protocols, meant to ensure you don’t get stuck at an automated gate in London or New York later on.
The 15 Common Pitfalls: Why Your Photo Didn't Make the Cut #
I’ve spent years analyzing photo compliance, and most rejections fall into one of these fifteen buckets.
1. The 'Floating Head' Syndrome: Background vs. Clothing #
This is the most common mistake for DIY photographers. The official ICA photo guidelines require a pure white background. If you wear a white shirt, your shoulders disappear. To an AI checker, you look like a floating head. This lack of contrast makes it impossible for the system to identify your body silhouette.
- The Fix: Wear a dark-colored shirt—navy blue, black, or dark green works best. This provides a sharp 'edge' for the software to identify where you end and the wall begins.
2. The 'Shadow Ninja': Subtle Facial Shadows #
Lighting is everything. If you stand too close to a wall with a single overhead light, you’ll get a 'shadow halo' behind your head. Even worse are 'nose shadows' that obscure the philtrum (the groove above your upper lip), a key biometric point.
- The Fix: Use natural, front-facing light. Stand about 50cm away from the wall to minimize background shadows.
3. The Eyebrow Rule: Hair Positioning #
Singapore is particularly strict about eyebrows. Your fringe or hair cannot touch or cover your eyebrows. Why? Because the brow ridge is essential for depth-mapping in facial recognition.
- The Fix: If you have long bangs, pin them back. Even if it’s not your preferred style, it is a non-negotiable ica passport photo requirement.
4. Excessive Digital Retouching #
We live in the age of filters, but the moment you use a 'beauty mode' that smoothens skin texture, you’ve altered your biometrics. If the ICA system detects unnatural pixel smoothing, it’s an automatic rejection.
5. Eyewear Glare and Thick Frames #
While you can wear glasses, frames that cover the eyes or a tiny bit of reflection on the lens will trigger a manual review.
- The Fix: Take them off. Your passport photo doesn't have to show you with glasses, even if you wear them daily.
6. The 'Smirk' Rejection: Facial Expression #
The rule is 'Neutral Expression, Mouth Closed.' A slight smile might seem friendly, but it changes the shape of your cheeks and the distance from your mouth to your nose. Think 'bored' rather than 'happy.'
7. Incorrect Head-to-Frame Ratio #
ICA requires the head to occupy 70% to 80% of the frame (usually 25mm to 35mm from chin to crown). Many people upload a 'selfie' where their head is too large. If you're looking for where to take passport photo Singapore residents often prefer using a professional passport photo app that handles this scaling automatically.
8. Off-White Backgrounds (The 'Cream' Trap) #
If your wall is 'eggshell' or 'cream,' the AI will flag it. It must be a flat, non-reflective white. If you make passport size photo online free, ensure the tool replaces the background with the exact hex code for pure white (#FFFFFF).
9. Compression Artifacts #
If you take a great photo but send it to yourself via WhatsApp before uploading, the compression destroys the image quality. ICA requires a file size under 2MB but with enough clarity that pixels aren't visible.
10. The 3-Month Rule #
Your photo must be taken within the last 3 months. If your photo looks exactly like the one in your previous passport issued years ago, the system will flag it as outdated.
11. Red-Eye and Flash Reflection #
Using a direct flash often results in red-eye or a 'hot spot' on the forehead. Both obscure skin texture and eye detail.
12. Tilted Shoulders or Head #
You must be perfectly square to the camera. A 'portrait' pose where you lean one shoulder forward is great for LinkedIn, but it will lead to a Singapore passport rejection.
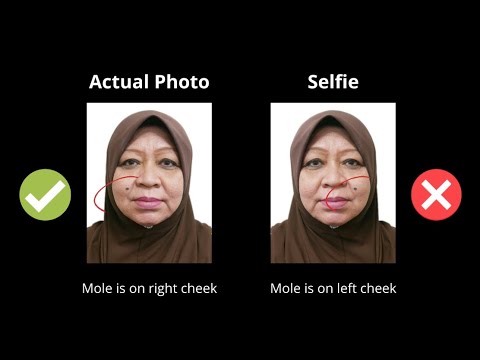
13. Religious Headgear and the 'Jawline Rule' #
Headgear is allowed for religious reasons, but it must not cover your facial features. For those wearing a Hijab or Tudung, the entire face from the bottom of the chin to the top of the forehead must be visible.
14. Uneven Lighting (Half-Shadow) #
If you’re sitting next to a window, one side of your face will be bright and the other will be dark. This 'split-lighting' is a nightmare for biometric software.
15. Blurred or Low-Resolution Images #
Even a slight blur that isn't obvious until the ICA officer zooms in will cause a rejection. Use a tripod or prop your phone on a stable surface.
Technical Deep-Dive: Pixels, Profiles, and Portions #
To ensure your passport size photo editor produces an acceptable file, you must adhere to these technical specifications:
| Specification | Requirement |
|---|---|
| Dimensions | 400 x 514 pixels |
| File Format | JPG, JPEG, or PNG |
| File Size | Under 2MB |
| Color Profile | sRGB |
Why sRGB? Most professional cameras use Adobe RGB, but web browsers and government portals are built on the sRGB Color Standard. If you upload an Adobe RGB photo, the colors may look 'washed out' or 'muddy,' triggering a rejection based on poor color balance.
The Newborn Masterclass: Photography for Infants #
Taking a newborn passport photo is arguably one of the most stressful tasks for new parents. ICA is generally more lenient with infants regarding the 'neutral expression' rule, but the white background remains non-negotiable.
The 'Swaddle & Sheet' Method:
- The Base: Lay a flat, white bedsheet on a firm mattress.
- The Lighting: Place the baby so their head is toward a large window for soft, even light.
- The Support: Use a small towel roll under the white sheet to keep their head straight.
- The Shot: Stand directly over the baby. Ensure no hands are visible in the frame supporting the infant.
DIY Smartphone Setup: Professional Results at Home #
You don't need a $2,000 DSLR. Your smartphone is more than enough if you follow this expert setup to make passport size photo online free:
- The 'Back-Off' Strategy: Don’t use the selfie camera. It distorts facial features (the 'big nose' effect). Have someone else take the photo using the 2x zoom lens from about 2 meters away.
- Stability: Prop your phone on a stack of books to ensure the camera is at eye level.
- Golden Window: Use a north-facing window between 10 AM and 2 PM for consistent 'cool' light.
The AI Safeguard: Why Manual Checks Often Fail #
The human eye is remarkably bad at judging whether a background is 'pure white' or if a head is exactly '75% of the frame.' This is where using a specialized passport photo maker becomes essential. These tools use edge-detection and biometric landmarking algorithms similar to those used by the ICA.
By the time you hit 'submit' on the MyICA portal, you already know the photo is compliant because it’s been through a digital dress rehearsal, checking pixel density in the eye area and sRGB profile validity.
Frequently Asked Questions #
What is the Singapore passport photo size in mm? #
The digital requirement is 400x514 pixels. If you are printing, the size is 35mm wide by 45mm high.
Can I take my own passport photo with a phone? #
Yes, as long as you meet all ica passport photo requirements, including lighting, background, and head proportions.
Why was my photo rejected even though it looks clear? #
Rejections are often due to technical biometrics, such as hair covering eyebrows, shadows on the face, or using the wrong color profile (Adobe RGB instead of sRGB).
Conclusion: Your Path to a Stress-Free Application #
A passport photo rejection is a waste of time you don't have. By following these technical guidelines—choosing dark clothing, mastering the lighting, and using a verified passport photo app—you effectively skip the queue. Don't leave your travel plans to chance. Treat your photo like the legal document it is. Set up your home 'studio' correctly, check your eyebrows, and use a professional passport size photo editor to guarantee that your next notification from ICA is an approval, not a rejection.
Ready to Create Your Photo?
Get your perfect passport, IC, or visa photo in minutes. AI-powered, ICA-compliant, instant download.
Create Your Photo Now