ICA Passport Photo Troubleshooting Guide: Rejections & DIY Success
Master the art of ICA-compliant biometric photos. Learn why photos fail manual audits, how to shoot newborn passport photos at home, and the critical differences between Singapore and Malaysia requirements to avoid application delays.
If you’ve lived in Singapore for more than five minutes, you know the Immigration & Checkpoints Authority (ICA) is a global gold standard for efficiency. But there’s one hurdle where even the most meticulous residents get tripped up: the passport photo.
You spend twenty minutes hunting for the right light, upload your shot to the MyICA portal, see the green 'Success' checkmark, and assume you're golden. Then, ten days later, that dreaded email hits your inbox: "Your photo has been rejected. Please re-submit."
Using a professional passport photo app can prevent your two-week renewal timeline from morphing into an eight-week marathon. This guide goes beyond generic advice to break down the biometric science ICA uses, why human officers reject photos that AI bots initially accept, and how you can guarantee approval on your first try.
The High Stakes of a 'Pending' Status: Why Your Photo Isn't Just a Selfie #
A passport photo is a high-security document, not a social media profile picture. In Singapore, the ICA uses sophisticated biometric matching software to link your physical face to the digital data stored in your e-passport chip. When you submit a subpar photo, you aren't just making an officer's job harder; you're creating a potential security mismatch at the automated lanes in Changi Airport.
The real cost of a rejection isn't just the few dollars you spent at a booth—it's the lost time. According to recent ICA processing trends, a rejected photo can push your application to the back of the queue. If you're renewing during peak travel periods, a single rejection can be a total disaster for your plans.
The ICA Biometric Standard: Beyond 35x45mm #
Most people know the dimensions: 35mm wide by 45mm high. However, the ICA follows the strict ICAO Document 9303 standards, which include detailed facial mapping requirements.
The 70-80% Face Rule #
This is the most common reason for DIY failure. ICA requires your head—from the chin to the crown—to occupy between 25mm and 35mm of the vertical space. If your face is too small, there’s too much background; if it’s too large, you’re zoomed in too close.
Expert Tip: To avoid lens barrel distortion—which makes your nose appear larger and ears smaller—don't stand too close to the camera. Stand at least 2 meters away and use a slight optical zoom instead.
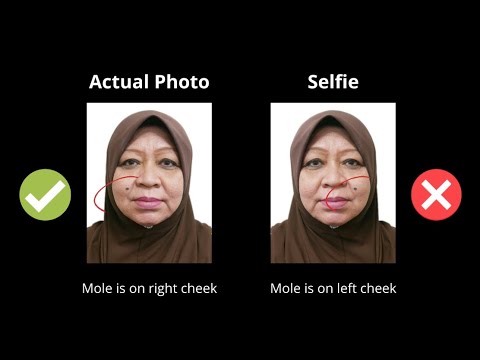
The 'Delayed Rejection' Audit: Why Photos Fail 10 Days Later #
It’s a common frustration: the MyICA portal says the photo is fine, then rejects it a week later. The portal uses a basic AI validator for initial checks, but a human officer performs a manual audit later, looking for:
- JPEG Artifacts: High-resolution biometric scanners cannot read pixelated images caused by low-quality compression.
- Soft Shadows: Faint shadows behind the ears or under the chin can interfere with edge-detection algorithms.
- Digital Alteration: ICA detects skin-smoothing or "beautification" filters. These lead to automatic rejection.
Lighting Pitfalls: Shadows, Glare, and the 'White Hair' Challenge #
Lighting is the hardest element to nail at home. Overhead ceiling lights are the enemy; they create "raccoon eyes" (dark shadows in the sockets). Official ICA Photo Guidelines state that your iris and pupils must be clearly visible without reflection.
The 'White Hair vs. White Background' Dilemma #
For silver-haired seniors or fair-blonde expats, ICA's matte white background requirement is tricky. If you stand flush against a white wall, your head effectively disappears. You can see visual examples of correct lighting and background separation on the US Department of State photo site, which shares similar high-standard benchmarks.
The Fix: Step about 50cm away from the wall. This creates a natural depth that prevents your hair from blending into the paint and avoids harsh back-shadows.
Glasses, Hair, and Expression: The Subtle Killers of Approval #
Can you wear glasses? Yes, but it is risky. The rules are narrow:
- Zero tinted lenses.
- Frames must not cover any part of the eyes.
- Zero reflection or glare.
Regarding hair, your eyebrows must be visible. The ICA system uses the distance between your eyebrows and other features as a primary biometric marker. Ensure you maintain a neutral expression—no smiling or showing teeth.
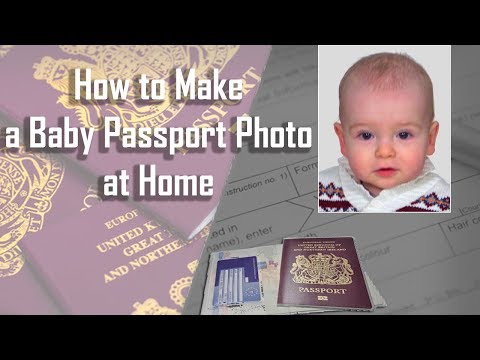
The Parent’s Survival Guide: Newborn Passport Photos at Home #
Getting a photo of a three-week-old is an Olympic-level challenge. Traditional studios are often too bright, causing babies to squeeze their eyes shut.
Pro-Tip for Infants: Lay a plain white sheet on a firm mattress and place the baby on top. Shoot from above to capture the required head-on view.
- The 'Hands' Rule: No part of your hand can be in the frame.
- The 'Eyes Open' Rule: Use a rattle or a squeaky toy right behind the lens to grab their attention for the shot.
Cross-Border Nuance: Singapore (35x45mm) vs. Malaysia (35x50mm) #
For Malaysians living in Singapore, requirements are not identical. Using a Singapore-sized photo for a Malaysian passport renewal will result in rejection.
| Feature | Singapore (ICA) | Malaysia (High Commission) |
|---|---|---|
| Physical Size | 35mm x 45mm | 35mm x 50mm |
| Face Size | 25mm - 35mm | 25mm - 30mm |
| Background | White (Matte) | White |
Always verify current requirements with the Malaysia High Commission Singapore before submitting.
The DIY Blueprint: Using a Passport Photo Maker at Home #
You don't need a professional studio. Follow this 4-step setup using a smartphone and a passport size photo editor:
- Natural Light: Face a large window during the day (diffused light is best).
- Positioning: Stand 1.5 to 2 meters away from the photographer to avoid facial distortion.
- Contrast: Wear a dark-colored shirt to provide a clear contrast against the white background.
- Verification: Use a dedicated tool to check the 70-80% face ratio before uploading.
Frequently Asked Questions #
Why was my ICA photo rejected even after the website accepted it? #
The MyICA website performs an automated technical check for file size and format. A human ICA officer later performs a manual audit for biometric quality, shadows, and facial features.
Can I take my own passport photo with a phone? #
Yes, you can take a photo with a smartphone, but you should use a passport photo maker like IC Photo Singapore to ensure the background, dimensions, and biometric ratios meet ICA standards.
What should I wear for a Singapore passport photo? #
You should wear dark-colored clothing to provide a sharp contrast against the required white background. Avoid white or very light pastel colors.
Why AI-Powered Validation Beats Traditional Photo Booths #
MRT station photo booths are often outdated. They use harsh lighting and don't provide the real-time biometric feedback required for modern standards. Using a specialized passport photo app gives you unlimited attempts and the precision of AI validation.
By choosing an expert service, you get a lifetime remake guarantee. If ICA rejects the photo for any reason, it is fixed for free. Don't let a minor photo error ruin your travel plans—ensure your submission is perfect the first time.
Ready to Create Your Photo?
Get your perfect passport, IC, or visa photo in minutes. AI-powered, ICA-compliant, instant download.
Create Your Photo Now